BotWheel Explorer
Hardware Build
TODO
ODrive Configuration
Lay your robot upside down on the ground so the wheels can spin freely in the air.
Connect the left wheel ODrive with your computer using a USB cable.
Go to https://gui.odriverobotics.com/configuration and configure the ODrive according to the screenshots. All values that you need to change are highlighted below. You can leave all other values at their default (some fields are left empty).
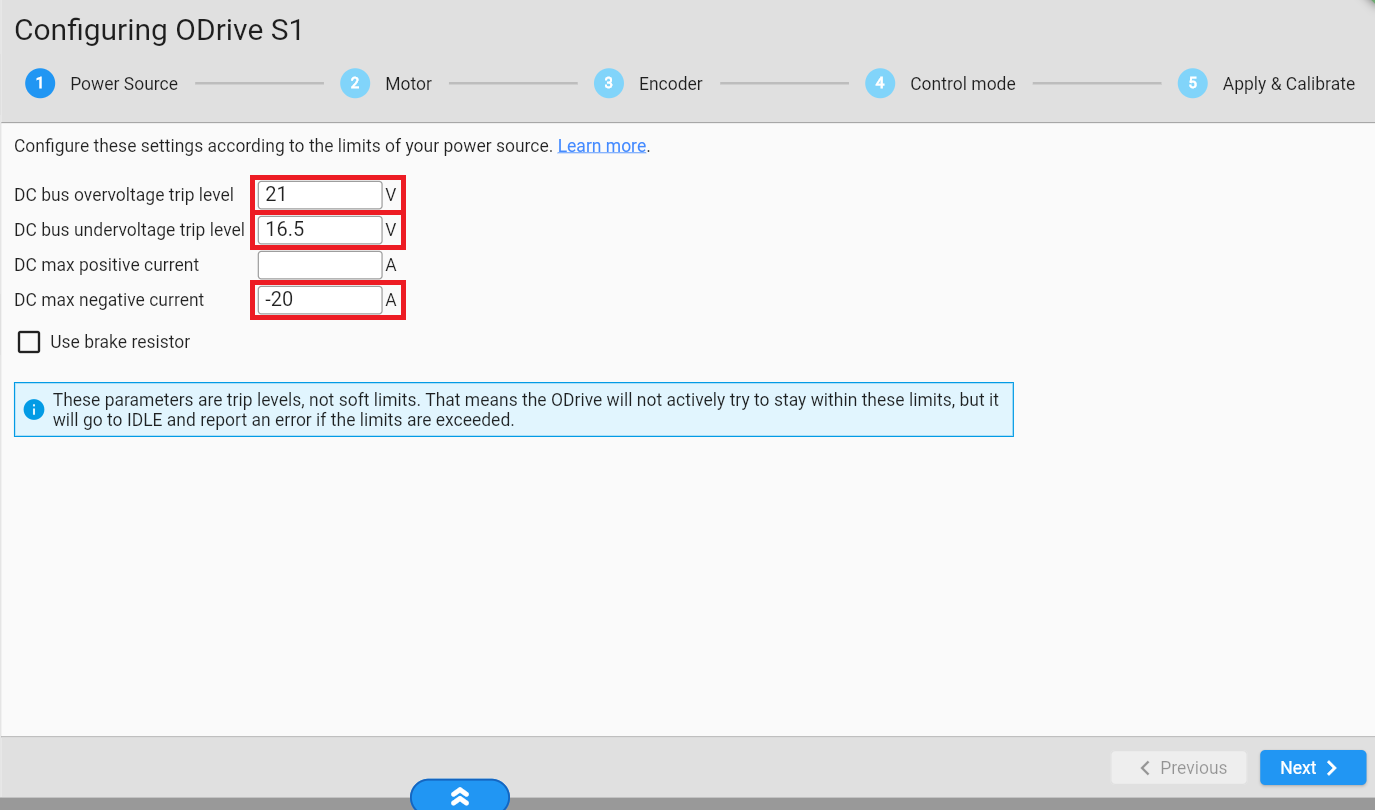
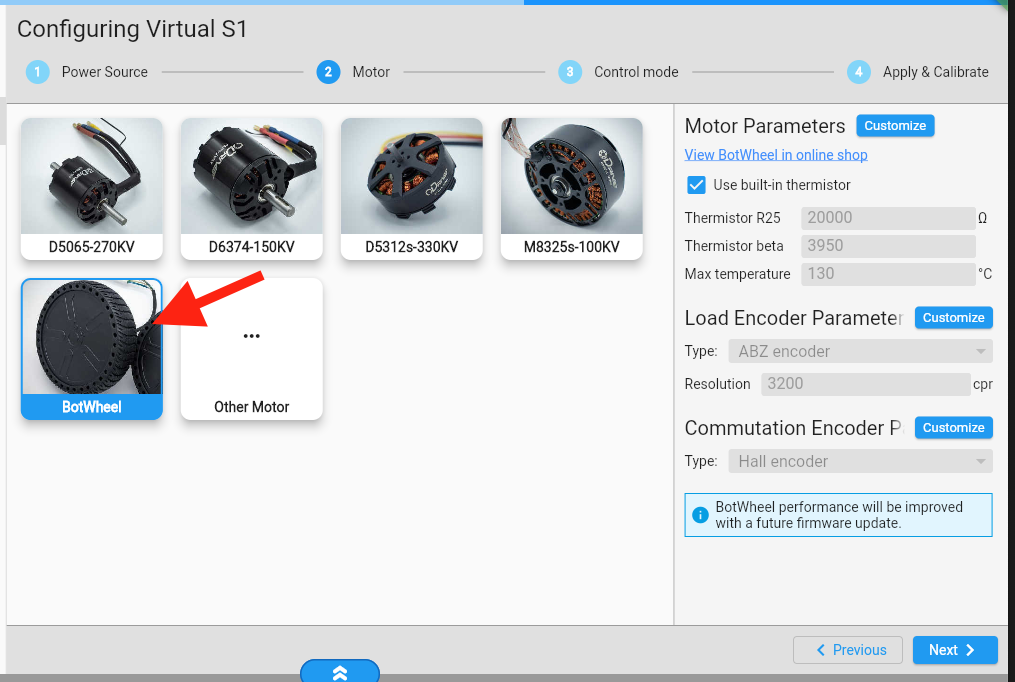
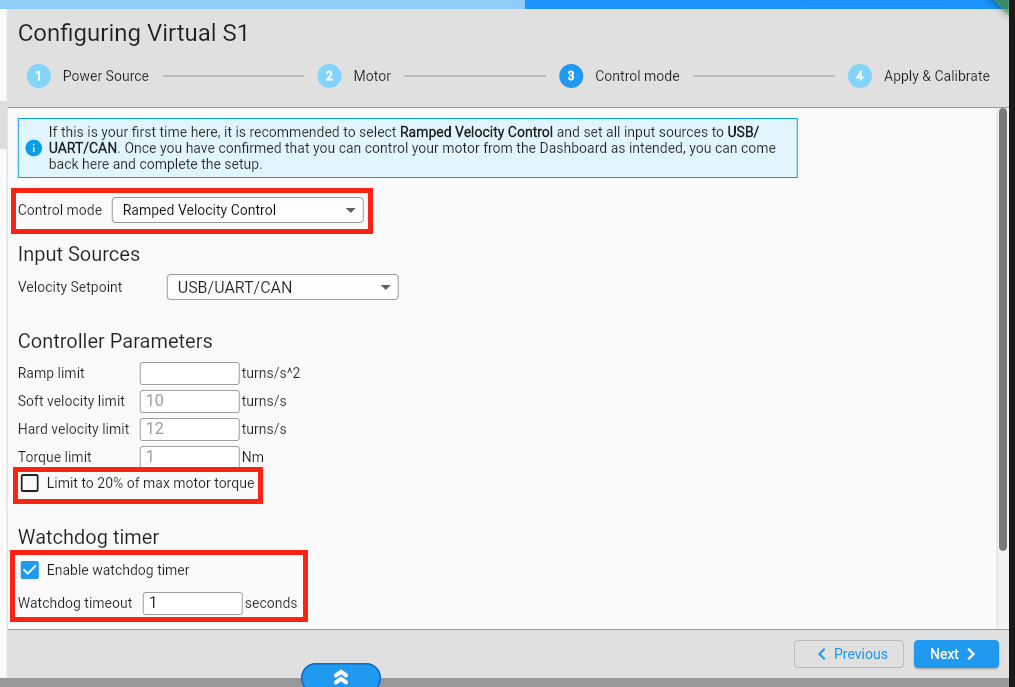
Make sure to enable the GUI’s watchdog feeder (expand the bottom bar to reveal this switch). Later, when we run the robot, the Raspberry Pi will take over this task.

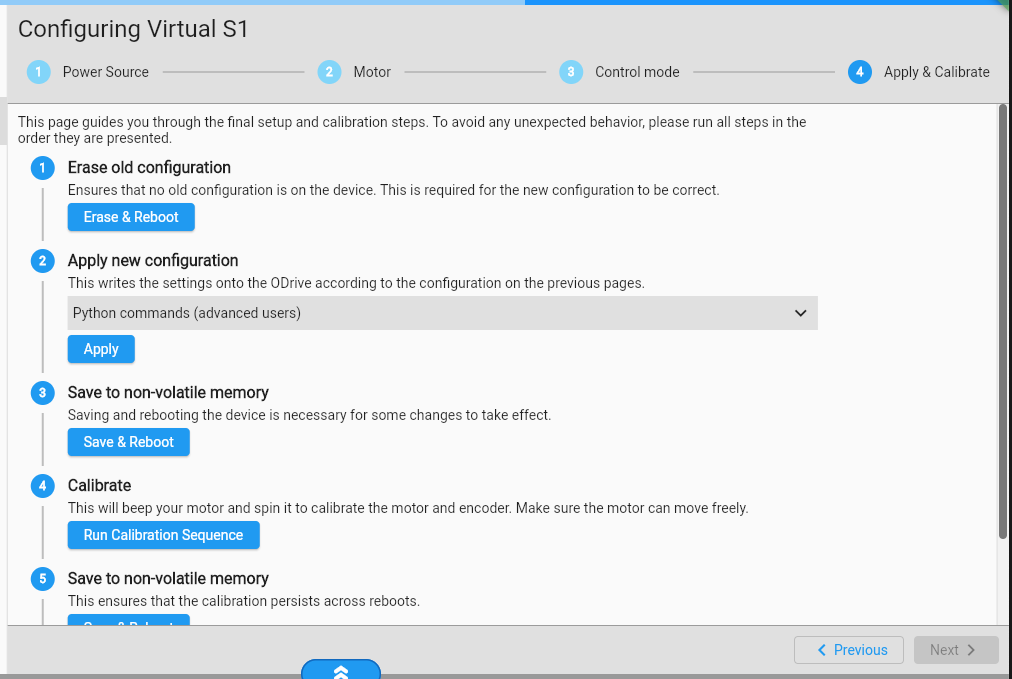
On the last wizard page, click all action buttons in order.
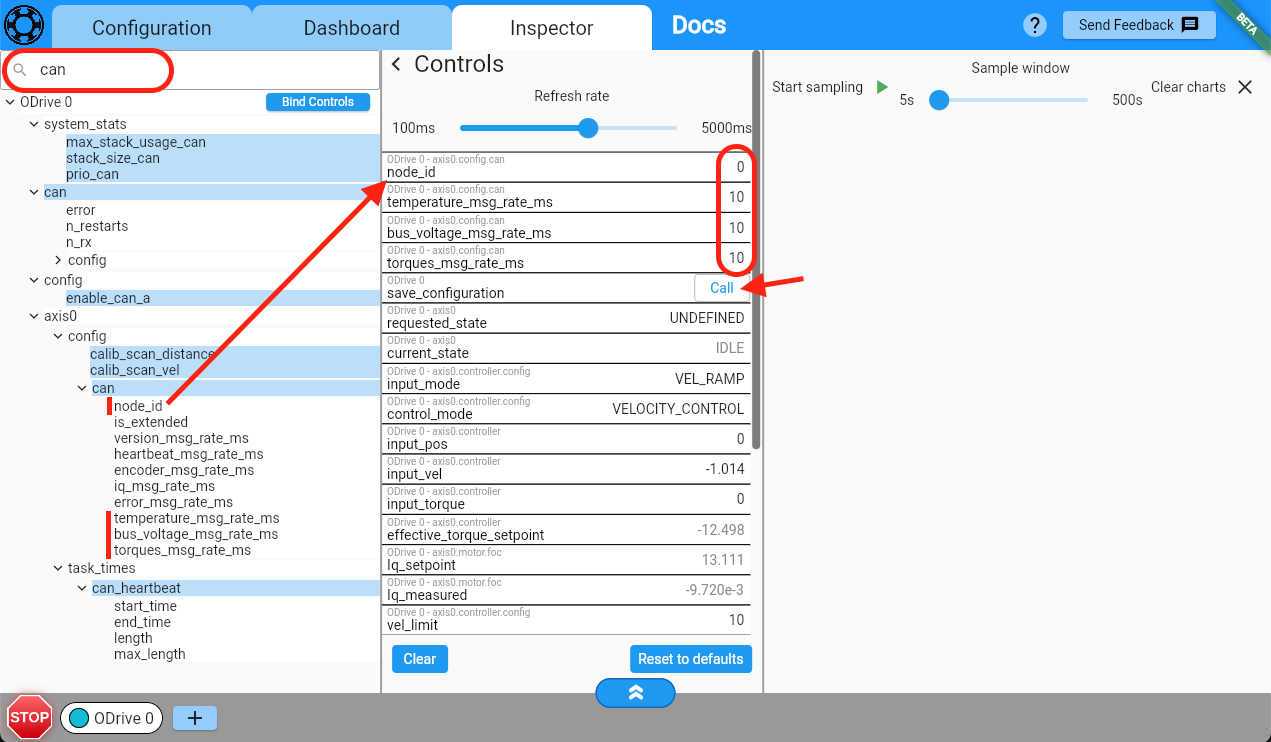
Next, we will set the CAN configuration in the Inspector tab. Click on Inspector, search for “can” and drag the four highlighted elements into the Controls column.
Set them as shown below and then press “Call” on save_configuration (by default this can be found at the end of the list).
Note
If you come to this step the second time (for the right ODrive), the controls will show red because they are bound to the left ODrive. Press “Bind Controls” in the tree view to rebind them to the right ODrive.
axis0.config.can.node_id = 0 (left ODrive) or 1 (right ODrive)
axis0.config.can.temperature_msg_rate_ms = 10
axis0.config.can.bus_voltage_msg_rate_ms = 10
axis0.config.can.torques_msg_rate_ms = 10
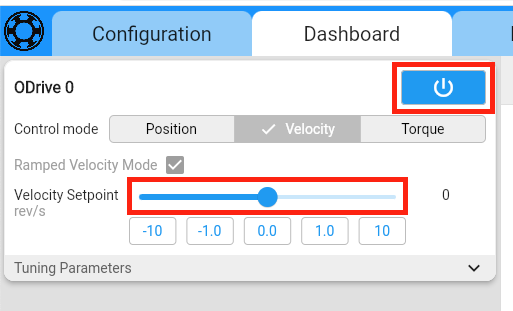
To verify that your ODrive is configured correctly, connect the battery to the ODrive. Go to the Dashboard and click on the Power button (you may need to click “Clear Errors” first). When you drag the velocity slider, the wheel should start spinning with the commanded velocity.
Repeat steps 2 through 5 with the right wheel ODrive. Everything will be identical, except for the
node_idin step 4.Configure gpio10 and an Estop using the
min_endstop. Like before, you can use the Inspector tab for this.<odrv>.axis0.min_endstop.config.gpio_num= 10<odrv>.axis0.min_endstop.config.enabled= True<odrv>.axis0.min_endstop.config.is_active_high= False<odrv>.save_configuration()
Raspberry Pi Setup
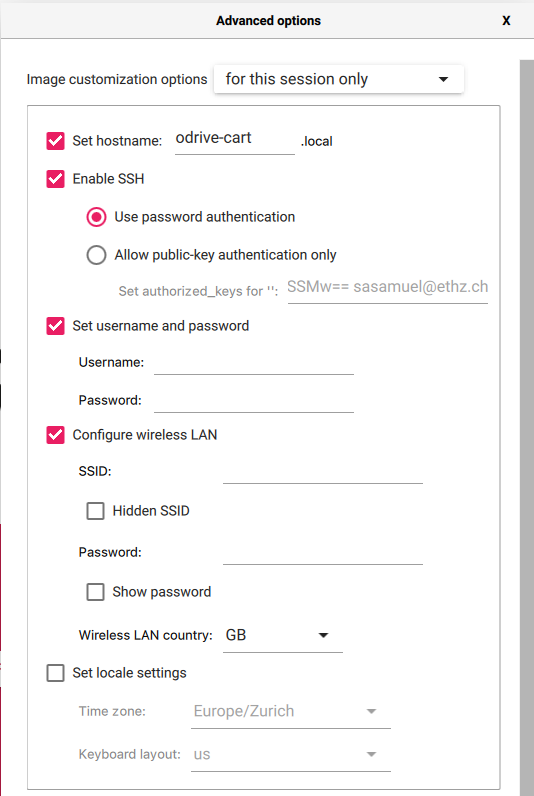
Install an operating system on your Raspberry Pi’s SD card. You can use the Raspberry Pi Imager for this. We recommend the following settings:
Operating System: Raspberry Pi OS Lite (64-bit)
Advanced settings (⚙ icon):
Set the hostname and note it down for later
Enable SSH and use password authentication
Set username and password, and note them down for later
Configure wireless LAN
If you’re an advanced user, feel free to use the settings that are best for you.
After writing the image to the SD card, insert it into the Raspberry Pi and power it up. It should automatically join your Wi-Fi network.
On your main computer, log into your Raspberry Pi remotely via SSH.
ssh username@odrive-cart.localAll subsequent instructions are meant to be run via SSH on the Raspberry Pi.
Enable the CAN hat:
Open the
/boot/config.txtwithsudo nano /boot/config.txt
At the bottom of the file, add the following:
dtparam=spi=on
dtoverlay=mcp251xfd,spi0-0,oscillator=40000000,interrupt=25 # configure can0 interface
dtoverlay=mcp251xfd,spi1-0,oscillator=40000000,interrupt=24 # configure can1 interface
dtoverlay=spi1-3cs
dtparam=spi=on
dtoverlay=mcp2515-can0,oscillator=12000000,interrupt=25 # configure can0 interface
dtoverlay=spi0-hw-cs
Reboot the device for these changes to take effect.
sudo rebootInstall dependancies:
sudo apt -y install git can-utils python3-can python3-websockets python3-qrcode
Clone the repository that contains the control script:
git clone https://github.com/odriverobotics/ODriveResources.git
Running the example
This section assumes you’re still logged into the Raspberry Pi via SSH.
When the Raspberry Pi starts up, the CAN interface is down by default. Bring it up with this command:
sudo ip link set can0 up type can bitrate 250000
Launch the control script:
python3 ODriveResources/examples/odrive-cart/bot_ctrl.pyAdvanced Options
Serve the webpage and websocket over SSL using a self-signed certificate:
python3 ODriveResources/examples/odrive-cart/bot_ctrl.py --ssl
When you connect with your browser it will complain because the certificate is self-signed and therefore provides a false sense of security. Press “Advanced” and “Proceed to site” to ignore the warning.
Use a different CAN interface:
python3 ODriveResources/examples/odrive-cart/bot_ctrl.py --can can1
Ignore one ODrive for testing:
python3 ODriveResources/examples/odrive-cart/bot_ctrl.py --ignore right
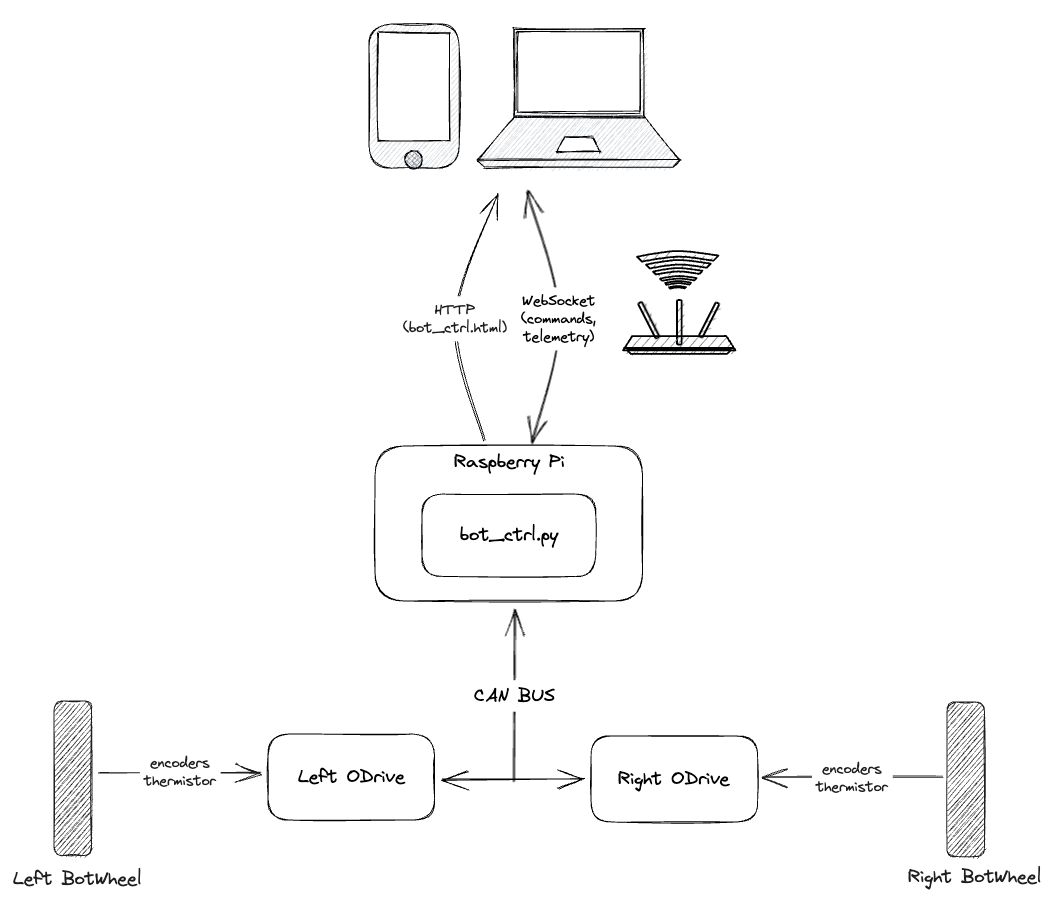
The control script will show a QR code in the terminal. You can scan this with your phone or copy & paste the address into the browser address bar on your computer. The address points to a webpage that serves as a remote control for the robot. Note that your remote control (phone or computer) must be in the same network.
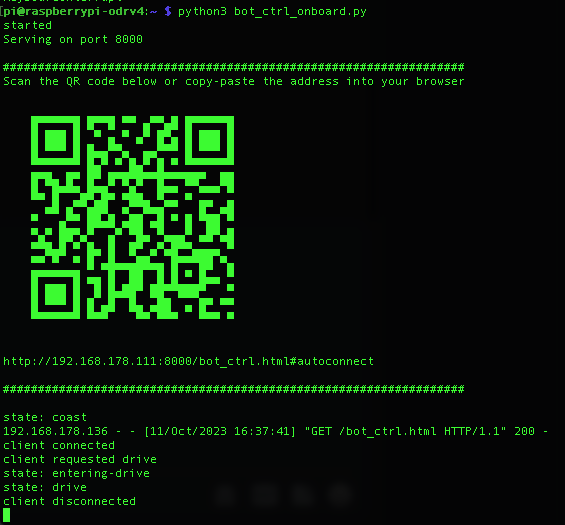
On the remote control page, press “Drive”
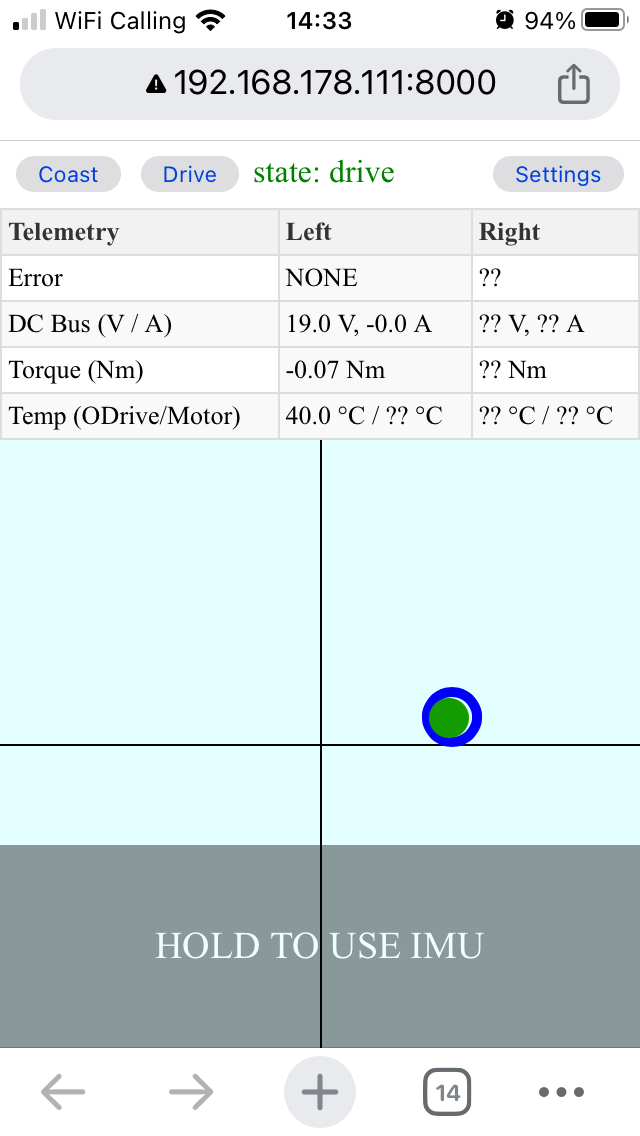
You can now use your mouse/touch, keyboard, joystick or IMU (on a smartphone) to drive the robot around. Press “Settings” for more info.
The blue circle indicates the commanded velocity and turn rate. The green ball indicates the actual velocity and turn rate, based on the actual velocity feedback from BotWheels.
Note
To enable IMU support, some browsers require the page to be served over an encrypted (SSL) connection. See step 2 for details.
Running the example on startup
After initial testing (section above), you probably want the control script
bot_ctrl.py to start automatically when you power up the robot.
To achieve this, run the following commands on the Raspberry Pi:
sudo cp ODriveResources/examples/odrive-cart/bot_ctrl.service /etc/systemd/system/
sudo systemctl daemon-reload
sudo systemctl enable bot_ctrl.service
sudo systemctl start bot_ctrl.service
Note
Open bot_ctrl.service in a file editor to see if the arguments are right for you.
This will create a systemd service for the control script, enable it to start on system start, and also start it right away. If the script exits for any reason, systemd will restart it.
To view the connection URL and QR code:
sudo journalctl -xe
To view the status and the most recent log output, run
sudo systemctl status bot_ctrl.service
Example Code
TODO: add explanation about the interesting parts of the example code.
